Homemade Twinkies
This recipe began with a Christmas gift. Dave gave me both a “twinkie” pan and a frosting injector – what a fun present! I put it to use to take a sweet treat over to our friends’ house for a day of watching football. It was the same day we made those yummy soft pretzels (another many-dish in the kitchen! Oh well.) It was so worth it! I don’t even remember the last time I ate the packaged version, but I can definitely see the appeal of this snack if you are talking about REAL, homemade cake and frosting. In fact, I saw the appeal so much that I ate like four of them.

While looking around the Internet for ways to start this recipe, I learned something. You can use coconut oil instead of shortening in frosting (or “creme filling” in this case). WHAT. That seems like a far better choice! I can’t wait to experiment more with this. I think I’ll make this change as much as possible – seems like it would be a lot better for you.
The weekend is almost upon us, friends. Dave and I are probably going to go see “Her,” head to a party and find another amazing Portland restaurant to experience. As you know, Oscar nominations came out today, so my movie-seeing priorities have realigned slightly. Also, in the last three seconds I just realized that it is a long weekend. What a perfect opportunity to make twinkies.
This recipe will make 14-16 Twinkies – there are plenty of versions of this pan available for $15-20. I’ve also seen tutorials for making them out of aluminum foil. You can also just make them as cupcakes!
For the cakes:
1/2 cup butter, softened
1 1/2 cups sugar
3 eggs
2 1/4 cups flour
1 teaspoon salt
3 1/2 teaspoons baking powder
1 1/4 cups milk
1 teaspoon vanilla
For the creme filling:
1/4 cup coconut oil
1/4 cup unsalted butter
1 cup powdered sugar
1 tsp. Vanilla extract

Preheat the oven to 350 degrees and grease your pan/tinfoil canoes well.
Cream the butter and sugar in a stand mixer or with a hand mixer. With the mixer on low, add in the eggs one at a time.
Sift the flour, salt and baking powder into the bowl and fold in gently. Finally, stir in the milk and vanilla. Pour into the pan/canoes and bake for 15-20 minutes, or until a toothpick inserted into the cake comes out clean. Remove from the oven and allow to cool for five minutes in then pan. Then remove to a wire rack to cool completely before you pipe in the cream filling.
In your stand mixer, use the whisk attachment to whip the coconut oil and butter together. Then, with the mixer on low, slowly add in the powdered sugar and the vanilla. Beat until light and fluffy. Chill while you wait for the cakes to cool.
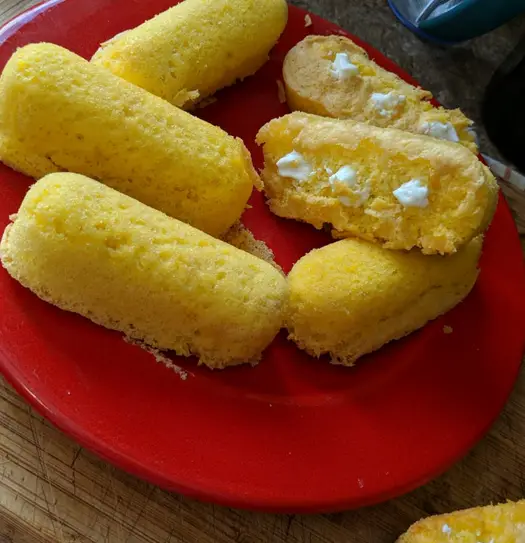
When the cakes are completely cool, move the creme filling into an icing bag or a specific filling device (you can find the one I have in the photo here – I am really happy with how it worked out!). Use a chopstick or something similar to poke three holes into the bottom of the cake, going about halfway through. Poke your frosting tip right into the cake and pipe a little bit of the creme filling into each hole. This may take some trial and error to figure out the right amount – too much and the cake will split open! That happened on at least two of mine, so be careful and proceed slowly.
Store in an airtight container.